Sunday, November 15, 2009

Experimenting with the ListFieldIterator webcontrol

In some circumstances you’ll need to display a SPListItem in its display, edit or new mode in an application page for example. In that case you can iterate through each SPField of an SPList, find the appropriate webcontrol of the field’s datatype and set the appropriate rendering mode of the webcontrol.


The quickest / easiest way to do so is by using the BaseFieldControl class.This way it doesn’t matter which field you want to render. The right control will be used.

BaseFieldControl webControl = [SPField].FieldRenderingControl;
webControl.ListId = list.ID;
webControl.ItemId = item.ID;
webControl.FieldName = [SPField].Title;
webControl.ID = GetControlID([SPField]);
webControl.ControlMode = mode;

Another way to display a SPListItem in your custom webpart or application page is by using the ListFieldIterator Webcontrol. This webcontrol renders each SPField of a SPListItem with an appropriate webcontrol. That way you get the SharePoint look & feel and the validation of your form for free.
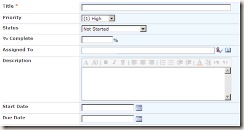

ListFieldIterator_ListItem


If you’d like to use the ListFieldIterator and would like to give the user the ability to display, edit or create a new SPListItem without having permissions on the SPList itself … you must set the SetContextWeb property of the ListFieldIterator with your elevated SPWeb object.
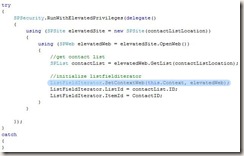

ListFieldIterator_RunWithElevated

References:

Sunday, October 11, 2009

SPContext in HTTP Module

Got the 'System.InvalidOperationException' when accessing SPContext in your HTTP Module? To solve this, make sure you attach your eventhandler to the application.PreRequestHandlerExecute event instead of the application.BeginRequest event.

Thursday, July 30, 2009

How To: Extend Telerik RadEditor FlashManager with FLV Player

As you maybe know, the full-featured version of the Telerik RadEditor is able to use flash objects (.SWF files). Customers like this feature, especially in a WCM environment. However, some customers feel the need to play .FLV files into the RadEditor. Since this isn’t supported by Telerik, we have to build it ourself.


Below I’ll guide you through the steps necessary to extend the FlashManager Dialog.


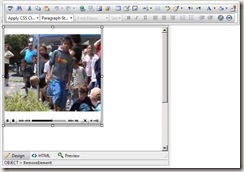
TRadEditor_ToolBar


Preparation


Download (buy) the full featured-version of Telerik RadEditor (at the moment of writing the latest version is 5.5)


I noticed that the HTML field control strips out OBJECT tags. For this reason, place the Telerik RadEditor on top of a NOTE field.


Download and upload a FLV player into your SharePoint environment ( Style Library, Layouts folder, …). You can download the player here.


Extend the Telerik RadEditor


Once you are done with the preparation you can start with the real work…

Extend the configfile.xml with the following properties:


TRadEditor_ConfigXml

Download the Telerik AJAX RadControls sourcecode (I think this is only possible if you have a developer license). There you’ll find a usercontrol, named FlashManager.ascx. Copy this file into the /_layouts/[ProjectName]/RadEditor/EditorDialogs/ folder. Note: This path is equal to the ExternalDialogsPath value available in the configfile.


Open the FlashManager.ascx and search for the _getParams method. In this method you can write all your FLV magic. The code below is just a snippet.


TRadEditor_FlashJavaScript

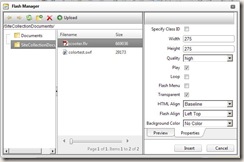
Now we are able to select, set parameters and place a FLV player into our editor.


TRadEditor_Properties


TRadEditor_EditMode


If you find any difficulties with the implementation of a FLV player… feel free to make a comment or contact the Telerik RadEditor Team.

Saturday, July 18, 2009

Some cool stuff in InfoPath 2010!

Looks like we will use InfoPath 2010 a bit more in our daily SharePoint development... Using it, you now can customize SharePoint list forms by modifying the layout, create views, adding validation, etc...

In InfoPath 2010, we’ve made some big investments to make it much easier to build rich forms-based applications on top of the SharePoint Server 2010 platform.

For more info read - What's new in InfoPath 2010?

Wednesday, June 24, 2009

Is it time to B!ng?

Custom Document Library Item check-in throws error

I got the miserable "Value does not fall within the expected range" error after checking in an item in my newly created custom document library with a custom content type.

Since the cause of the error "Didn't fall within my knowledge range" I had to google ... and *bing!* found what I was looking for.

Lesson learned: Do not set the "required" attribute to true in your content type definition.

Wednesday, May 27, 2009

Accessibility: Empty text alternatives for ASP.NET image control

While building an accessible website you need to take into account that the following elements must have an ALT attribute:
  • img
  • area
  • input with type="image"
Why we need it?

The ALT attribute is designed to be an alternative text description for images.

What are the benefits?
  • Enhance the browsing experience of visitors with disabilities.
  • If somehow the image is not able to load, then a visitor will see the description of ALT attribute. This will also help when someone is using text based browsers like Lynx.
  • By having ALT attribute you are increasing the keyword density which is very good in terms of
    Search Engine Optimalisation (SEO).
What about decorative images?

The alt attribute for decorative images should be empty [alt=""] to meet the accessibility and XHML standards. If you include an empty alt attribute, screen readers will skip over the image. If you don't... the screenreader will read the entire URL of the image, which is quite annoying for the visitor.

What about the ASP.NET image control?

By default, when the AlternateText property is not set, the Image control does not include the alt attribute to specify the alternate text in the control rendering. If you set this attribute to be empty [AlternateText=""] you will notice that the control ignores it too.

Fortunately, since .NET 2.0, the image control contains a GenerateEmptyAlternateText property. It specifies whether or not the control creates an empty string as an alternate text. Set the GenerateEmptyAlternateText property to true to always include the alternate text attribute in rendered output for the Image control.

Thursday, May 7, 2009

Off-topic: Have you ever been to New York?

Take a look at that wonderful Aerial Virtual tour.
  • Turn on your speakers
  • Left below you'll find more views
  • Don't forget to enter the fullscreen
@TomPoint: Don't look at it.Within a couple weeks you'll see it in reality. :)

Wednesday, April 22, 2009

HtmlDecode RSS Feed

I had to HTMLDecode the output of the ListFeed.aspx (OOTB RSS viewer within SharePoint). After digging into the SharePoint DLL's with Reflector I overwrote the render function. To make sure this change wasn't effective for the whole environment, I made a copy of ListFeed.aspx and made a custom action (as a replacement of the OOTB 'View RSS' action) to refer to the copied file.

Tuesday, April 7, 2009

Whitespace character in XSL

I noticed that   wasn't working in my XSL file, used   instead and it worked like a charm.

Tuesday, March 31, 2009

How To: Change Styles Within RadEditor Field Control

I'm currently using the free RadEditor Lite. It's a cross-browser alternative to the default rich-text editor in MOSS and WSS v3. For those who don't know this HTML editor, take a look at Telerik. It's a well made alternative with some pros and cons. In this post I'll highlight one of it's cons: Styling within the RadEditor can be hard. I'm not talking about styling the skin - but especially about the font, background, etc.

I thought this was an easy task by just changing some CSS classes et voila...Not! My aim was to change the styling from within my own stylesheets. The difficulty was due to fact that the RadEditor is rendered in an IFrame.
  • My first attempt: override styles - with no result.
  • My second attempt: access the IFrame and add a class on it with DOM manipulation - with no result
  • Last but no least, my third attempt: access the IFrame, add a class on it and add an extra CSS Link reference in the head tag - with result.
Method: in detail
  1. Modify the ConfigFile.xml
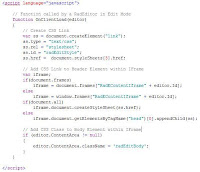
  2. Write some javascript to access and manipulate the IFrame
  3. Create a CSS Class / File
1. The RadEditor can be configured with the ConfigFile.xml (located in C:\Program Files\Common Files\microsoft shared\Web Server Extensions\wpresources\RadEditorSharePoint\4.5.4.0__1f131a624888eeed\RadControls\Editor)

Add an extra line: [property name="OnClientLoad"]OnClientLoad[/property]
This will tell the RadEditor to execute the OnClientLoad javascript function while loading the control.

2. Place the javascript function somewhere in a file - masterpage for instance:

(I referenced my stylesheet with document.styleSheet[x].href and added a CSS reference in my masterpage with $SPUrl: ~SiteCollection to get a relative path to the CSS file.)


3. Create a new CSS Class, named 'redEditBody', in your referenced CSS file. Now you're able to modify his styling.

Sunday, March 22, 2009

How To: Pass parameters to XSL with CQWP

I build a customized CQWP to add paging (without using connectable webparts) and some filter options. I needed some information in the XSL about the amount of pages, current pagenumber, ... to build up the paging. That kind of information was available in my CQWP class but I had no idea how to access them from within my XSL. After some google research I found an excellent article of Waldek Mastykarz that helped me a lot.

Monday, March 2, 2009

The Facebook Kit for SharePoint

I don't have to tell you that Facebook is hot these days... As expected, the hype has reached SharePoint. I think this kit has a lot of potential to leverage a surplus value for the social networking aspect in SharePoint.

The Facebook Kit for SharePoint (FKS) leverages the Facebook Connect API to bring to your end users fingers tips great web parts that will help make your SharePoint sites more "Social" and integrated with Facebook!

Download the Facebook kit here...
Related webparts: SharePoint FaceBook/Smoelenboek WebParts
Related source: White paper: Managing social networking with Microsoft Office SharePoint Server 2007

Thursday, February 26, 2009

No searchresults for content available in welcome pages

I wrote a custom multilingual searchwebpart which uses the FullTextSqlQuery class to execute a search query. The webpart is used in a WCM scenario and his task was to find all publishing pages related with the given keyword.

After a while I noticed something weird... the webpart could find all keywords available in various fieldcontrols except for those content available in welcome pages.

After some research, it seems to be a SP bug. Thank goodness, MS has already released a hotfix package for this.

Monday, February 2, 2009

Peekaboo Bug: IE7

I ran across an ugly IE bug while developing a page layout. After some research it seems to be a crazy-making "peekaboo" IE bug.

Peekaboo (also spelled Peek-a-boo) is a game similar to hide and seek, but played with babies. In the game, one child, teenager, or adult hides their face, pops back into the baby's view, and says — to the baby's amusement Peekaboo! I see you!

Symtoms:
Certain content mysteriously disappears when you take some mouse action.

In my case it looks like this:


Cause
:
Setup of floating elements

Fix:
You have to set the "Layout" for the DIV element. You can set "Layout" in different manners eg. position, zoom, height,... attribute.

The hasLayout MS-property is a sort of flag: when it is set, the element has this layout “quality”, which includes special capabilities — for instance, on the floating and stacking — for the element itself and for its non-layouted child elements.

Some more information about hasLayout: The concept of hasLayout in IE/Win.

How To: Manipulate Navigation Settings Programmatically

__ Global navigation


__ Current navigation


Global navigation

1) web.Navigation.UseShared = true; web.Update();
2) web.Navigation.UseShared = false; web.Update();

Current navigation

1) publishingWeb.InheritCurrentNavigation = true;
publishingWeb.NavigationShowSiblings = false;
publishingWeb.Update();

2) publishingWeb.InheritCurrentNavigation = false;
publishingWeb.NavigationShowSiblings = true;
publishingWeb.Update();

3) publishingWeb.InheritCurrentNavigation = false;
publishingWeb.NavigationShowSiblings = false;
publishingWeb.Update();

Note: InheritCurrentNavigations value is "false" by default.

PS. Thanks to Robin's post for pointing me in the right direction and for his help ;)

Friday, January 2, 2009

How To: Alternative login mechanism for public MOSS Site

To start the new year I'll show you how to make an alternative login mechanism for your public SharePoint site. The solution consists of 2 parts:
  • Hide the "Sign in" link for anonymous users
  • Create a Login subsite with a redirect page.

The reason for hiding the "Sign in" link for anonymous users is obvious. If your site doesn't need a login system for anonymous users - it can be confused to show a "Sign in" link.

1) Hide the "Sign in" link
Place a SPSecurityTrimmedControl around the Welcome usercontrol within your masterpage.


The SPSecurityTrimmedControl is responsible for showing/hiding certain content, based on user rights. The Welcome usercontrol is responsible for showing the "Sign in/Welcome John Doe" link.

When you navigate to your site as an anonymous user, you'll notice that the "Sign in" link isn't visible anymore. Hmm... If we want to contribute to the site, we have to log in right? How can we login to the site if the link is not visible? Read on...


2) Create a Login subsite with a redirect page.

Create a subsite (based on the blank site template) on the toplevelsite and call it "Login". The next thing we have to do is to create a redirect page on the Login site. You can make one with the OOTB site template "Redirect Page". The "Redirect Page" page layout contains a redirect control for automatically directing readers to any specified URL.


Go into edit mode of our newly created redirect page and fill in the following URL in the Redirect URL textbox:


/_layouts/Authenticate.aspx?source=/pages/default.aspx


The authenticate page gives you the opportunity to log in to the site. The querystring source tells us where to go when the authentication process is finished.

The last thing we have to do is to set the Redirect Page as the welcome page of our "Login " site.

Conclusion
When we enter our sharepoint site as an anonymous user, we don't see a "Sign in" link anymore. If we want to contribute (read: log in) to the website - all we have to do is to navigate to http://localhost/Login.